
Hey, this is going to be an angry article. Just warning you.
All the “how to create an online course easily” articles ranking for this topic are complete bullshit. It really pisses me off. Can I swear like this? Hope Google doesn’t mind.
Selling online courses is HARD.
You need to be an expert and dedicate months to creating a legit course. If you want to sell $5 Udemy courses… GO READ ANOTHER ARTICLE AND WASTE SOMEONE ELSE’S TIME.
If you want to build a BEAST of a course. Like, a real flagship masterclass that earns you a bank, this is the article for you.
I’m going to walk you through how I planned, created, and marketed an online course that’s earned me well over $50,000.
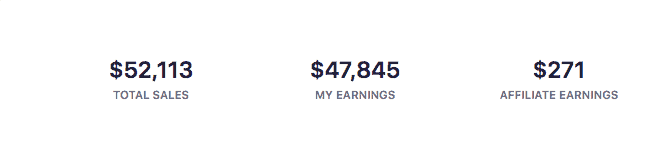
Do you want to wake up to emails like this regularly?
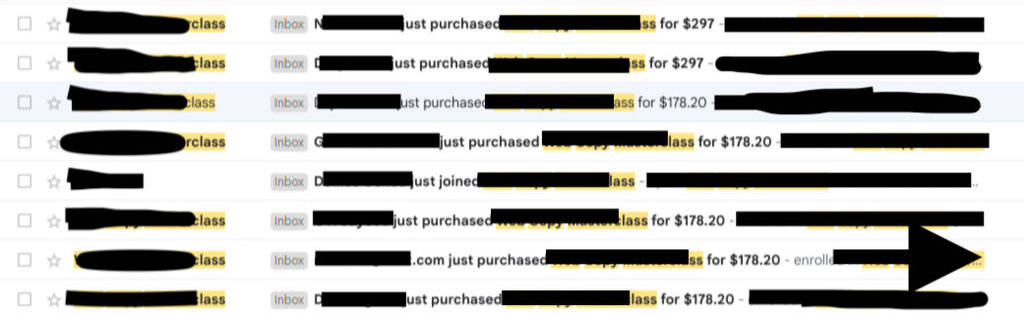
Keep reading.
In this article, I’ll show you:
- What you need to create an online course
- The best online course marketplaces and platforms
- How to make your course outline and brainstorm
- How to plan and create your course content
- Everything I’ve learned about marketing online courses for free (including some marketing tools and tips)
- How to make sure your course topic can sell
- What you need for a landing page
- My secret tips about selling online courses that you can’t find anywhere else
- Other course creator secrets you can’t learn unless you actually run an online school
- How to pre-sell your course the right way (everyone gets pre-selling wrong)
Making a profitable course is hard, but with this guide, you’ll learn exactly how to plan, create, and market a course from someone who’s actually done it. Not from some freelance hack writing for a random marketing site.
Can you tell I’m jaded? Let’s get to it.
Why You Already Need a Topic for Your Online Course
If you don’t know your topic yet, then close this article. This article is for serious online course creators that want to make real, expert-level courses that actually help people.
If you want to make cheap Skillshare or Udemy garbage, go there.
The state of the online education industry is a travesty. So many course creators don’t have any clue what they’re talking about. They just identify a gap in the market, create some basic video content, and then try to call themselves profitable online educators.
Just because there’s market demand does not make you qualified to create actual content or run an online community.
They’re all lying to you.
WOW, ok. Chill out, Karl. It’s not that big a deal.
FOCUS.
In order to create a legit course, you need the following:
- A real area of expertise in online business, a hobby, an industry, or some academic topic
- Social proof for that expertise such as testimonials, published articles on other sites, or tangible results
- A good story to use for your sales page (we’ll cover this during the market testing phase)
- A verified audience or, even better, an existing audience
- A unique value proposition (what makes your course better than someone else's?)
- Some basic equipment like a mic and screen recording software
- A lot of caffeine, red wine, and a strong will to live
You don’t need to know exactly what the name or the topic will be, but if you aren’t an expert in your hobby, niche, or industry, this article won’t help you.
What Do You Need to Record an Online Course?
You’re lucky to be doing this now. Creating an online course has never been cheaper and easier. You can make a high-value course with as little as a basic mic and some screencasting software.
Teaching online isn’t nearly as expensive as most YouTubers make it seem. You don’t need a professional mic or webcam. Those help, but they aren’t necessary.
All you need is the following:
A Good Lapel Mic
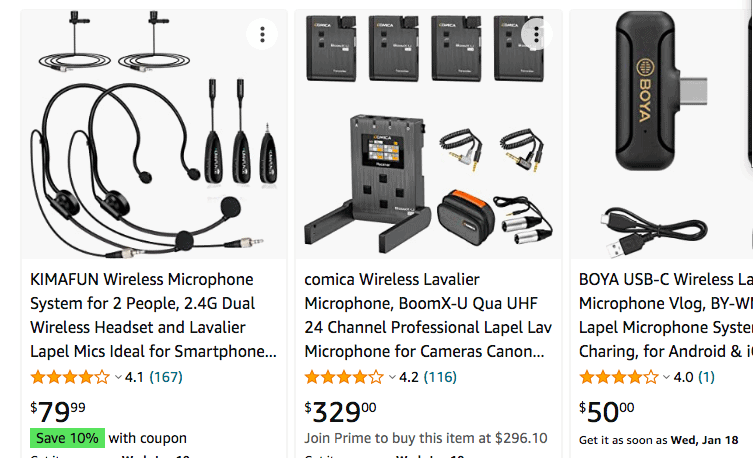
This is your first course, so you don’t need million-dollar production value. A simple lapel mic like this will do. You can even buy a cheaper one.
The mic plugs directly into your computer and with screen recording software, you can record video and audio together in the same program simultaneously and get great audio.
How do I know? I did it. And my students love it.
Now I personally use the Rode Wireless GO II but that may be overkill if you're just starting out.
Next…
Screen Recording and Video Editing Software
All you need is some basic software to create a video course. You don’t even need to show your face. You could show your face in the corner of the screen as you talk over slides, but again, it’s not necessary. I didn’t.
My advice is this: if you want to show your face and your laptop is new enough to handle recording your face and screen simultaneously, then be my guest.
I had a 2017 MacBook when I made my first online course, and it couldn’t handle recording my screen and camera at the same time.
I chose Camtasia, and it worked like a charm.
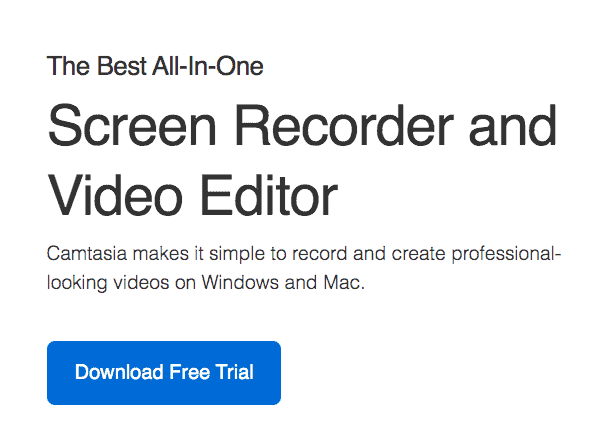
Camtasia is the most popular screen recording tool for course creators. It was basically designed specifically for creating an online course with high-quality video, audio, and editing.
Once you edit your video, you can export it directly to Google Drive or your desktop.
I chose it because it’s easy to record video and audio at the same time, and it’s very intuitive to edit. Everyone I know has Camtasia. If I were you, I’d get it and just skip to the next step.
How to Create an Online Course Step-By-Step
Phase 1 – Planning and Outlining
Let me tell you a story…
I totally skipped the whole “planning thing” for my first online course. Guess what happened?
I made millions, retired in the Philippines, and haven’t worked a day since.
Just kidding… I lit 3 months of my life on fire.
My minimum viable product (MVP) was so bad I literally deleted it after getting two thumbs down. I’m pretty sure my first online course still has a rotten score of 30/100 on Rotten Tomatoes. I had to go back to the drawing board.
Plan. Your. Course.
Trust me, the road ahead is stressful. Planning is actually the fun part. It’s 10x easier than actually recording and editing the course (**shivers**).
It’ll make creating your course easier, save you a ton of editing time, and drastically improve the quality of your online course, and it should only take a day or two maximum.
OK, let’s get to planning your course. Like all good things in life, it starts with a mind map.
Step 1 – Brainstorm
Go to a coffee shop and start getting your thoughts on paper.
And do me a favor—enjoy this brainstorming time. This is as fun as your course gets until you make a sale.
Excited?
The key when brainstorming is to essentially reverse engineer the end product from the ground up. I’m a very visual learner, so I prefer using a mindmap. Miro is 100% free and super easy to use.
It totally changed my planning process and helped me discover little nuances to include in my course that really helped my students.
You don’t have to make a mindmap, but I recommend it. Feel free to use a document and jot down bullet points if you want.
How to Brainstorm Your Course Properly
The key to creating a killer course is to put yourself in a beginner’s shoes. You want to build a complete online course from the ground up (unless otherwise specified).
Experts tend to fall victim to cognitive bias where we assume everyone knows just as much as we do. This happens EVERYWHERE, especially in courses. This type of thinking leads to you building courses for yourself rather than for your ideal customer.
Kill this mentality.
Remember, you’re reverse engineering the end goal. It’s the same no matter what type of course you build. Gardening, biohacking, how to become a clown (easy—skip planning), or how to communicate with your dog telepathically. It’s all the same: Start with the end goal and work backward.
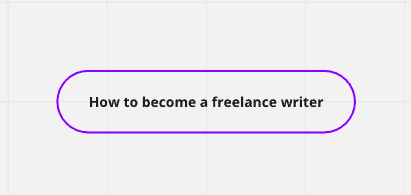
Here’s an example of “How to become a professional freelance writer.”
Start with the end goal.
The end goal, in this case, is that the user can support themselves comfortably by writing freelance.
OK, so let’s work backward from that. What does a pro freelance writer need? Feel free to do this however is easiest for you, but what’s always worked for me is starting with the most important thing first.
In this case, the most important thing a pro freelance writer needs is paying clients. So let’s start with that.
So, step 1 of our process would be to write down, “How to find paying clients.” OK, cool. Well, what do they need in order to find paying clients? In this case, it would be outreach. So, write down “outreach.”
If it’s easier for you, feel free to do it from the ground up. That would look something like this:
How to become a freelance writer:
- What is a freelance writer?
- The basics: What type of writing is in demand now?
- How to write well
- How to prepare to find clients
- How to find clients
- How to manage clients
- How to level up and raise prices
How you plan is up to you. In the end, you’ll get something that looks like this:
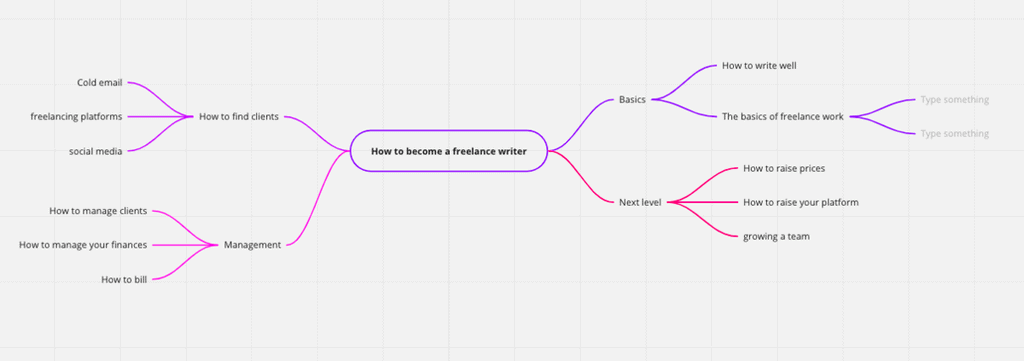
NOTE: This is not an exhaustive mindmap. You should’ve seen mine before. It looked like The Architect’s command room in The Matrix.
Step 2 – Choose Which Type of Online Course You’ll Create
I was so green when I started making online courses that I didn’t even know there were different types of courses. I thought everyone was either some $5 Udemy course or a $5,000 Dropship Lifestyle mega-course. The rabbit hole goes way deeper.
The reason I want you to plan this now rather than when it’s too late is that it will totally change your outlining, planning, course page, and supporting materials.
You could always come back and do it later, but getting it done now will make the online course creation process way easier.
There are roughly 3 types of courses:
Mini-Courses

I’m a “go big or go broke” type of guy, but there’s some merit in creating mini-online courses. These are best used as lead magnets or supplemental online courses to your main course.
Make these short and sweet. It should be about an hour, mayyybeee 90 minutes tops.
Skip all the intro fluff, skip the theory, and don’t get too high-level. Choose the simplest, most actionable parts of your larger course and build a small, cheap course that’s easy to digest.
Mini-courses are great for validating larger course ideas (way more on this super important step later).
Drip Courses
This is one of those “I love this idea but there are only 365 days in a year and I’m too busy to bother” type things. We’ve all got them, right?
Drip courses are when you DON’T release all your learning materials at once. Instead, you slowly release new material to your students (called “drip feeding”) at regular intervals.
You could also set it so students “unlock” new material as they create objectives.
Drip courses are best for super complicated topics like “How to start a dropshipping business,” “How to grow an Amazon store,” or “How to become a web developer.” You don’t want to overwhelm your students all at once.
Instead, they go at their own pace and take in every lesson rather than just blazing through.
If you’ve got a skill that’s highly complex or you want to include a number of challenges inside of your course, drip courses are the way to go.
Flagship Masterclass

“Yar she blows!”
Masterclasses are massive, on-demand courses designed to take someone from beginner to expert on a specialized topic. These tend to be 5 to 10 hours of total course material or more.
Here’s a great example from copywriting genius, Kevin Meng. Web Copy Masterclass is 50+ videos of how to write compelling web copy based on nearly 10 years of writing experience.
Masterclasses should show a student, step-by-step, how to master a skill. By the end, they should be highly knowledgeable on the topic.
If you aren’t a real expert, do not try to lie your way into making a masterclass. People will know. These sell for anywhere from $300 to $5,000+.
Step 3 – Plan Course Extras
I can’t think of a single good online course that just has the course material. You’ll need to add extras to justify your asking price and provide your students with an optimal learning experience.
As a rule of thumb, your online school should at least come with bonuses.
Let’s start with that first.
Course Bonuses
Ever wonder how those 3 AM infomercials selling totally useless gadgets like the “Slap Chop” work?
Bonus stacking.
Not only do your students get the full course, but for the same price they’ll get more bonuses like extra lessons, downloadables, an ebook, 1-to-1 coaching, etc.
In my first course, I offered a free 30-minute consultation to all students. Later on, I added even more extras.
Bonus stacking flat-out works. Slap Chop did a ton of bonus stacking. You not only get this borderline useless vegetable chopping device peddled by a random dude with no high school diploma and an orange tan…
But you ALSO get replacement blades, a 10-year warranty, a cheese-slicing blade, and a grater!
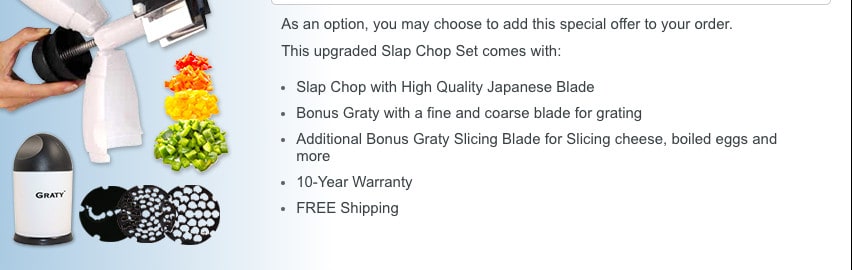
Bonuses seal the deal.
Wait, I kind of want the Slap Chop now actually.
Nooooooo….
Bonuses can be anything that helps a student beyond the knowledge in your videos. A few ideas are:
- Checklists
- Swipe files
- Coaching
- A list of suppliers (for eCom courses)
- Product ideas
- Helpful websites
You could also do more time-intensive things like personal coaching or events. Dropship Lifestyle organizes entire retreats in exotic locations for its members.
One sweet value hack I learned at a Dynamite Circle meetup was setting up online knowledge events to justify course pricing and boost sales.
Speaking of that…
Plan Related Events
The most successful online courses these days have interactive events.
I’ll keep it 100 with you: I DO NOT do these, at least not as often as I should.
You could offer a free webinar, a 30-day challenge, an “ask me anything” session, weekly/monthly calls, or any other type of event.
These could be upsells, access to parts of your community, or just freebies you offer as a bonus. It’s your world—we’re just living it in it.
But trust me, plan these now.
A Course Community

If you’re planning a large, expensive course, then a community group is mandatory.
This allows your students to interact with you and each other, constantly learn, reinforce course materials, and be more successful in general. It also makes you the head of a mini cult of personality to stroke your ego.
Seriously, though.
Adding a Facebook group where you regularly post helpful info and interact with students raises perceived value in a huge way. It’s also a great place to gather feedback and create content.
You can create even more passive income streams like another course specifically for the students who’ve already taken your course. Courseception achieved.
Step 4 – Outline Your Course

Are you having fun yet?
Remember, this is the fun part of creating a course.
Jokes aside, if you want to make serious money, like $50,000, six figures, or more, then you need to put in A LOT of work and get it right. Money isn’t just going to appear out of nowhere.
Don’t worry, outlining is actually really easy when you break it down into 3 phases: Big, medium, and small picture.
I can’t tell you how vital it is to have a game plan. Without one, you’re totally lost. Imagine trying to record 60+ videos on different topics without planning it out. It’s not going to happen.
Planning actually DE-STRESSES you and shows you exactly what needs to be done. Once you have that, recording the course will be 10x easier.
Ready? Let’s take it slow.
Start With Big Picture Planning
Here’s where we paint with broad strokes. Let’s just get a skeleton in order first. Take your mindmap or outline and break it up into modules first.
Let’s take a familiar topic like guitar and make a “Guitar 101” skeleton. Big picture modules would probably be:
- Guitar basics
- Chords
- How to play the guitar (strumming and picking)
- Beginner songs
- Practice exercises
- Music theory
- Dealing with the endless train of groupies (this is a joke—don’t cancel me)
Easy, right? Come on, you’re an expert in this, champ. Get in there and start swinging.
For my search engine optimization (SEO) course, I knew I’d have to cover on-page SEO, link building, keyword research, content creation, and the technical side. That’s where I started, and it made my life way easier.
Break Down Each Module Into Core Concepts (Middle Picture)
Now, go back to your broader modules and break them down into subsections or at the very least core concepts that must be taught in each module.
Since I’m currently trying to learn the guitar, let’s stick with this example.
- Guitar basics
- Different parts of the guitar
- Tuning the guitar
- What is a note?
- What is a chord?
- How most guitar songs are structured
- Guitar vocabulary
Seems easy, right? It is. Don’t worry, it gets harder.
Break Down Each Concept Into Individual Lessons/Videos
No, you don’t have to script out each video just yet. But you must break down each concept into bite-sized video lessons.
If I were you, I’d break everything down into 5-minute videos (with very rare exceptions). As a rule of thumb, theory videos should be shorter than practical, applicable lessons.
The main reason is that they’re boring as hell and nobody wants to watch them. If videos start to run long, break them up into smaller parts (part 1, part 2, etc.).
This is optimal for student engagement, interaction, and retention.
Here are a few examples:
- (Big picture) Practicing guitar
- (Middle picture) Basic guitar practice techniques
- (Small picture) Basic strumming exercises, basic picking exercises, learning your first scale
Each one of these small picture chunks should be its own video (or videos).
In Kevin Meng’s Web Copy Masterclass, he does this:
- (Big picture) Writing Web Articles
- (Middle picture) Writing Your Intro
- (Small picture) Why your intro matters, how to write an intro properly, an easy intro formula, good intro examples
In the end, you should have the following:
- Modules
- Sections
- Individual videos within those sections
It should look something like this:
Just a quick note on structuring your course…
You want to offer an optimal learning experience that flows naturally and keeps the reader hooked. This means showing them exactly what’s to come and the outcomes they’ll achieve after completing each section.
Each module should have an intro video that describes the problem you’re solving and previews what’s to come in the following section.
If you really want to be an online course boss, show them how that info is going to make their lives better and give them proof. Remember, you’re an expert that’s been doing this for years, so you have proof…right?
Each subsection within that module should also have an intro video where you explain what’s to come. For example, in a web copywriting course, it would look like this:
- Writing module: Intro video with a complete overview.
- Writing an article introduction section: Intro video explaining the problem, your solution, the content to come, and how it’ll help achieve the end goal.
- Meat and potatoes: In these videos, you explain how to write an intro.
- Wrap up: Wrap up each individual series of videos with a TL;DR.
- Module wrap-up: Wrap up the entire module. Just do it.
OK, moving on.
Once you have everything planned out, you can prepare yourself for the excruciating fate that awaits anyone brave enough to attempt making an online course: recording and editing.
Ready your breakfast and eat heartily. Tonight, you dine in Hell.
Phase 2 – Creating Your Course
OK, the fun is over.
I find that new online course creators think they need to make a Spielberg-level production to sell. I know I did.
You need to fight that urge.
Students want valuable information and instruction. They aren’t paying to see Avatar in IMAX—they’re paying to learn. And who wants to spend 3 hours watching a blatant rip-off of Dances With Wolves for 3 hours anyway?
BTW, James Cameron admitted that Avatar was just Dances With Wolves in Space, so don’t hate me.
Check out some of these examples.
Guess how much this course costs?
About $5,000.
Or this one…
This one is $1,000. You never even see the creator’s face.
This is a slide from Kevin Meng’s web copywriting course (probably among the top 3 best online courses of all time).
Kind of like online dating, it’s what’s on the inside that counts—not how it looks (wait…. what?).
What I’m trying to say is that design and production quality are not NEARLY as important as you think. You just need expert knowledge delivered in bite-sized chunks in a visually acceptable way.
I’ve actually seen a negative correlation between production value and knowledge value in online courses.
It’s almost as if the creator is trying to distract you from a lack of actionable advice by wowing you with 10k video quality and a backdrop in the Caymans.
Ever wonder why those Amazon gurus who create stunning, super energetic courses end up getting arrested for fraud? Now you know.
Leave the amazing production value for your 3rd course, not your first.
Keep it simple. Make your slides and get on with it.
You really only need 3 types of content for your first online course:
- Slides: Teach your main concepts with succinct bullet points and pictures with clear examples.
- Sceenshares: If you’re teaching online processes like keyword research, programming, or building a website, then share your entire screen and walk your students through the process. I’ve found that these are best for demonstrating a process AFTER you’ve used slides to teach the basics.
- Real-time videos: For real-world topics, you only need to film yourself doing it with a basic camera. It shouldn’t look like the Blair Witch Project, but it doesn’t have to be Titanic either. A basic webcam or even an iPhone will do. This is for things like digging a hole in a gardening course or playing Am pentatonic over a Cmaj chord in a “Learn how to solo” guitar course.
Since this is probably your first online course, let’s just stick with the basics.
Step 1 – Create Your Slides
I used Google Slides. You really don’t need anything else.
Make sure that you create some master slides. You’ll want the following:
- A title slide
- Section headers
- Slides for images
- Basic text slides
Google Slides has them all pre-built if you’re lost:
Since you’ve taken the time to write a complete outline, this will be a lot easier. Don’t be like me. DO NOT be like me.

Take each key concept from your video outline and break it down into bite-sized chunks. For writing an introduction to a web article, it would be:
- What is an intro?
- Why is it important?
- What’s the problem with most intros?
- What’s the solution?
- How to write an intro
- Examples of good intros
- Wrap up
If you’re ever stuck, use the intro -> problem -> solution -> demonstration -> wrap-up format. This doesn’t work for all courses, but it’s a great place to start.
For simpler courses like gardening, you can eliminate some steps. It could be something like intro the concept -> explain what’s to come -> demonstrate skill -> wrap-up.
OK, now take each of these concepts and start grinding some slides out. Don’t worry, it’s going to get way worse before it gets better.
By the way, this is supposed to be hard. This is how you make six figures or more. You do hard shit that others don’t want to do. So stop crying.
Keep your slides short and sweet. Keep plenty of white space and use images on the right-hand side if needed.

In this slide from Matt Diggity’s Affiliate Lab, he’s explaining how to get all the right keywords on the page. He uses a nice image to the right and uses just 3 bullet points to get his key points across.
Remember: break it down into its simplest form possible.
If you create a master slide, you won’t have to adjust fonts, titles, colors, or anything. It’ll all be done automatically.
Step 2 – Fight Through the Swamp of Sadness

Now, life gets hard.
Every online course creator eventually gets to the Swamp of Sadness. Only the best make it through.
If you want to make it to the promised land, you’ve got to fight through…even if it means losing your horse. If you didn’t cry an ugly cry. Like a real, snotty cry when Artax was lost in the swamp, then you probably aren’t human.
Making your scripts, recording every slide, and editing each one is a B***. I quit SEO 5 separate times. I know people whose marriages hung by a thread because of this. You begin to question every life decision you’ve ever made.
Like, how have I ended up in a Vietnamese hotel room in the mountains trying to scream over a pack of rabid dogs outside my room just to walk someone through how to do keyword research?
This is the hardest part of making online courses, but you’ve got to keep going.
Step 3 – Record Your Slides
Recording your slides is actually fairly straightforward. It’s not easy. It’s just simple.
Take notes on each slide, click record on whichever software you’re using, and share your presentation while talking.
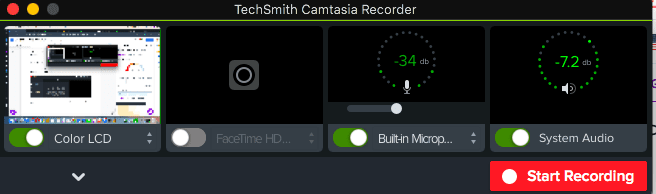
I used Camtasia, so it looks like this:
Then choose to share screen and be sure to select the audio input. I recommended a lapel mic before.
You could choose to use a camera and put your face in the bottom right corner or whatever, but it’s not necessary.
I recommend recording each video one at a time. That way, you can listen again and make sure you got it how you wanted it.
It does NOT need to be perfect. You can make as many “ummsss,” errors, coughs, or mistakes as you want. Just pause, wait, and start recording again.
Just make sure to put a place saver to help you edit. You can clap, say OK!, cough, or do the Macarena. I don’t care. But seeing that spike on the audio track will let you know where to pick back up to edit out mistakes.
NOTE – How to Make a Course Video Script
I DID NOT make a script for each video, and that’s totally fine. You don’t have to. I find it too constricting and my voice was starting to sound like Mr. Roboto.
“Next up, we have on-page SEO. On-page SEO is SEO done on-page. This means you optimize your page for search engines. Search engines are…”
You get the picture.
Some people just scribble out the main points. Others (mainly sociopaths) type out every single word and read the notecard as they record.
My method was simpler.
Present your slides in real time and talk over them as you would if you were recording. Go VERY VERY slow. It’s hard to remember exactly which bullet point is coming next, but if you go super slow, you can edit out any mistakes very easily.
If there’s too much “white space” between your words, you can edit that out too to make it sound more natural.
I think my go-with-the-flow method leads to more natural-sounding language and lets me be more funny and creative. I’ve gotten nothing but great feedback from students.
Step 4 – Edit Your Videos (Tip: DO NOT Edit Your Videos)

Editing is the worst.
Please, hire someone to do this.
You can find great editors on Upwork, OnlineJobs.Ph, or any other freelance platform.
Even if your videos are full of mistakes and a bit directionless, a good editor can whip up a great video 10x faster than you.
But if you’re stubborn…
The lifesaving thing about Camtasia is you can edit audio/video at the same time. No need to detach audio and synch everything up. This is why I implore you to use a lapel mic and record audio INSIDE of your recording software.
I know some people who recorded on GarageBand or Protools and they had to export their audio and then sync it up.
If you want to take 10 years off your life, be my guest.
Go through the video and wherever you’ve got a slip-up, just split at playhead like this:
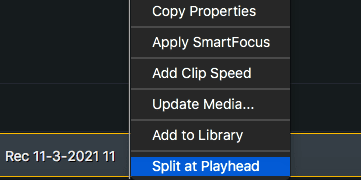
Delete the mistake, then attach the video sections together by clicking “stitch selected media.”
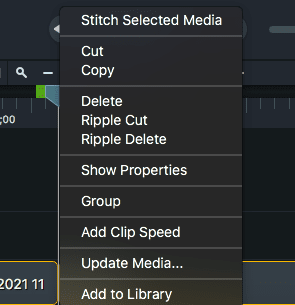
It’s there at the top.
Since you’ve recorded very slowly, this should be fairly simple. Just tedious as all hell. Try doing this for 60 videos :).
Once you’re done, export the file IMMEDIATELY. Mine ended up getting corrupted somehow and I lost an entire hour’s worth of content.
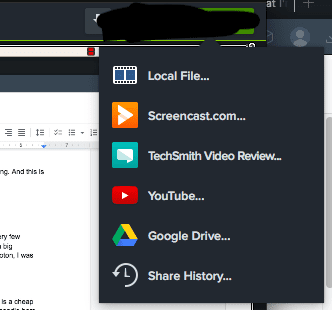
You can either share it as a local file on your computer or upload it to Google Drive. I prefer uploading directly to the desktop since it cuts out a step when you load it into your online course platform.
Pro Tip: When saving your videos, save them into a folder and give them the SAME NAME just with different numbers. My Course | Module | # – like that. This makes it much easier to upload later on.
Phase 3 – Choosing an Online Course Platform
Please take it from me: finding the right home for your course is much more important than you can imagine. Any issues with your course software won’t arise until after you start making sales. By that time, it’ll be too late.
Resist the urge to rush to get it online. That’s what I did. I chose Teachable off a friend’s recommendation, and I’m still paying dearly. Once your course is uploaded and live, it’s almost impossible to switch everything.
If you choose the wrong platform, you’ll pay more, miss out on a ton of key features, and put yourself way behind competitors. I am paying about $50 more per month for Teachable to this very day and missing out on tons of marketing features that I have to pay separately for.
Each platform is suited to a different type of course, entrepreneur, and end goal, so you need to choose the proper one for your specific course.
There are only 3 platforms I recommend to sell online courses. Here are the 3 best online course platforms.
1. Kartra
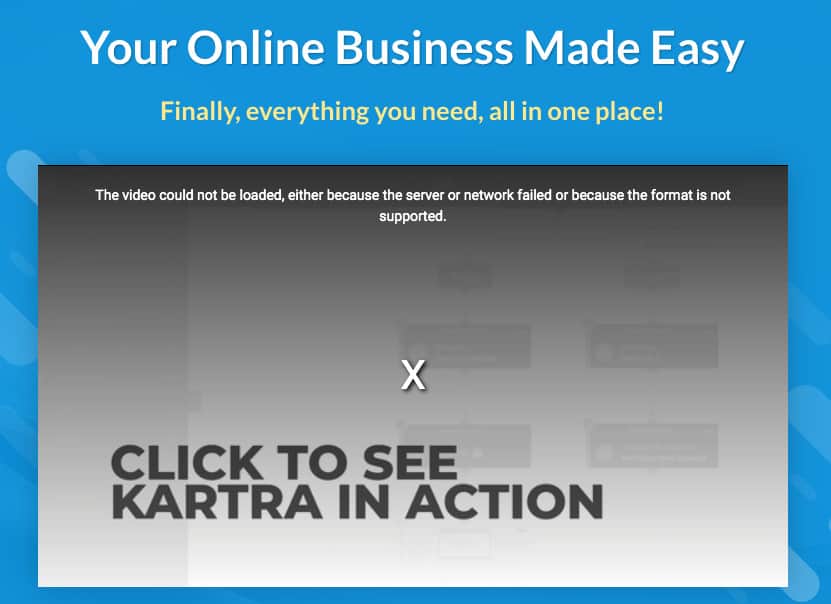
90% of you reading this need Kartra. It’s the best online course platform for new course creators—and it’s not even close.
It’s the only learning management system that has everything you need to create, manage, and market an online course in one easy-to-use platform. And it has it all for less than $100/month.
Kartra was designed for online course creators. It will make your life as easy as possible. This one platform comes with:
- Email marketing
- Landing pages (your landing page is crucial)
- Multiple types of online learning
- Pre-made marketing funnels
- Membership sites
- Affiliate marketing
- Community building features
And everything else you need, including helpdesks for when you’re a millionaire. Without Kartra, you’ll need to pay for a more expensive platform or buy 5 additional tools to supplement your course. Not worth it.
If you want to start making money as fast as possible, save money, and make life way easier, just get Kartra and be happy you did.
2. Kajabi
Kajabi is the ultimate online course learning management system. In fact, it’s so good that you probably don’t even need it yet.
Imagine if every other course platform took human growth hormone since birth. That’s Kajabi.
It has more marketing, community-building, analytics, sales page features, and funnel-building features than any other platform by a mile. I switched over a few years ago when my courses outgrew Thinkific and Kartra.
If you want to grow a course empire with several online courses, a community, a full website, and a thriving team, Kajabi is for you. If you want to start with one course and grow slowly, Kartra is a better fit (and cheaper).
3. Thinkific
Thinkific is the only legit free course platform out there. It gives you pretty much everything you need to start making money with your course 100% free—but with severe limitations.
The problem with Thinkific is you’ll eventually need to upgrade. And when you do, you’ll notice it isn’t as good as Kartra or Kajabi. That’s how they get you. You upload all your videos, bring in students, and start doing some marketing… now you’re trapped.
Next, you find yourself stuck with a limited platform that’s just as expensive as competitors with no way out.
If you want to offer a free online course or mini-course, Thinkific is a good place to start. It’s also solid if you’re on a tight budget.
But, like I’ve said a million times, take this as seriously as possible. If you’ve got the money, choose Kartra or Kajabi.
Phase 4 – Test, Refine, and Perfect Your Course
I know for a fact that none of the people writing the other blogs on this topic has ever once created their own online course. I can just taste it in their words.
One article suggested running ads to your course for “pre-sale” testing. I spit out my coffee.
Dude, running ads to a fully complete and refined course’s sales page is a money pit with low conversions.
Now you want to run ads on an UNFINISHED course? With no upsells in place? With no feedback mechanisms in place? With absolutely zero clout and success stories to convince people to buy?
It’s almost like they want you to fail.
Treat your course like any other software, business, or tool: Beta test first. This will give you a ton of great feedback from real students 100% free. Don’t worry about giving away too much value. Your course probably sucks right now anyway. Mine did.
Step 1 – Beta Test
Find 5-10 students to take your course and leave notes.
I don’t care where you find them. Just find them. People love free stuff. They’re out there.
Use Facebook groups, friends, business contacts, forums, Reddit—use whatever you have to and find at least 5 QUALIFIED people to take your course.
Give them a set of questions including:
- Did you learn a lot?
- How was my delivery?
- Is there anything I’m missing?
- How did it flow?
- Did it bore you anywhere?
- Were my videos too long or too short?
- Would you pay $X for this? (This will help you set a solid asking price)
My first draft of my SEO course was an abomination. After 10 students tore it apart, I ended up fixing the structure, deleting and re-recording about 30% of the videos, and changing the course extras.
The end result was a course that was 10x better. Not only that, I had excellent reviews from students who were ecstatic to get a free course. I made a ton of sales off word of mouth after the launch too.
NOTE: If you have successful students beta testing your course, ask them to become affiliates. If they recommend your course, give them 30-50% of the sale. This is how you’ll gain traction in the beginning.
Step 2 – Refine Your Online Course Based on Feedback
This is pretty cut and dry. Refine whatever you need to according to student feedback. Remember, this course is for them. NOT for you.
Add videos, delete videos, make videos shorter—do whatever it takes to make it better for your target audience.
Step 3 – Presell Your Course THE RIGHT WAY
“Just run ads to a landing page, bro” – Idiots who have no clue what they’re talking about.
Do not just run ads. Do you want to burn thousands of dollars? Because that’s how you burn thousands of dollars. Send that money to my PayPal instead.
You CAN presell your course, but you need to do it in an intelligent way. Here’s why:
Running ads on a course’s sales page might have the reverse of its intended effect. You could have a great sales page, but if your course is hundreds or thousands of dollars, students probably won’t buy it cold.
See the issue? You’ve got a great course and a great landing page, but all the data will tell you that nobody wants your course. This will cost money, discourage you, and may even trick you into making changes.
Don’t. Do It.
Do this instead…
Run ads to a “tripwire.” This is a piece of content that teases the value of your course. It could be a case study, a free mini-course, a webinar, or whatever you think is best.
Get the users’ email addresses and keep sending valuable advice. After you’ve hit them with value, then offer your course at a 30%-50% discount as a pre-launch sale.
Follow up with an exit survey similar to what you asked the beta testers. And be sure to ask for good reviews to add to your course sales pages.
If you’ve got the time and resources, release a mini version of your course on a site like Udemy or Skillshare. Make sure to get users’ email addresses if possible.
In your mini-course, tease the larger course that’s in the works and give users a discount coupon code for 30-50% off.
In the beginning, you need traction—emails, users, and reviews. You don’t necessarily need profit. That comes later.
This process is a bit complicated, but it’ll get tangible results on the cheap.
Phase 5 – Marketing Your Course
Coursepreneurs (did I coin this term?) often get stuck here. They make their course, then have no clue what to do next.
Most of this stuff is very simple, requires next to $0, and results in a huge ROI. By the way, this is how all successful courses make sales, so listen up!
Step 1 – The Basics
Get a course sales page up instantly.
Get a custom sales page done up by a professional or edit a template within Kartra or Kajabi.
Your sales page needs the following:
- A big sexy headline with the benefits and outcomes of your course
- Who the hell are you anyway and why should they buy from you?
- Social proof (where have you been featured? Who have you worked for?)
- Your story (all the Hellfire and brimstone you went through to learn the secrets in your course)
- Tons of happy student testimonials (this is why you beta test and give some courses away for free)
- A peek inside your course
- Before and after benefits (what life is like before and after taking this course)
- Facts (what exactly is inside the course)
- An appeal to logic (you’ve seen the benefits, so you’d be an idiot NOT to buy this course)
- Bonuses (remember Slap Chop bonus stacking?)
Once you’ve got a killer course sales page, you need to set up 2 more things:
- An upsell: you absolutely need at least 1 upsell. This could be 1-to-1 coaching, extra videos, bonus eBooks, or anything else with a ton of value. You will let thousands of dollars in value slip away without this. Remember: Don’t be like me.
- A lead capture: Not everyone will fork over hundreds of dollars right away. But they might fork over hundreds of dollars if you prod them several times over the next few months. Set up an email capture pop-up and ask politely for their email address in exchange for some free value. Anything related to your course will do. Set an email sequence and nudge them. Then, give a big discount. It works.
OK, let’s get our hands dirty and start bringing in sales 100% for free.
Step 2 – Free Marketing
I’m an organic marketing junky. Here’s my philosophy of all things Interwebz marketing:
If you provide real value, then you can make a fortune by providing free value to the world. You don’t need to spend money on ads if you don’t want to.
If you can only find interested visitors by buying them, then your value proposition isn’t good enough.
Here are 3 easy ways to earn sales without spending a dime.
Affiliates
Affiliates are a lazy man’s dream. Imagine an army of salespeople who don’t make any money unless they make sales. They work tirelessly while you sit by a pool in Bangkok sipping a margarita (wear sunscreen, please).
Set up an affiliate program where your affiliates make about 30%-50% for each sale. The standard rate is around 40%.
Some of your beta-testing students might want to be affiliates.
Finding more is a bit of a slog, but it’s worth it. The best places to look are:
- Facebook groups
- Google your keyword and look for high-ranking blogs. Email them, connect on Facebook, connect on Linkedin, or do whatever else it takes to make a connection. Send them an affiliate offer with a detailed explanation.
- Search for similar courses or google “top 5 best courses for (your topic)” and see who is reviewing those courses. Try to jam your way in there by making a better affiliate offer.
Guest Posts
Guest posts are one of my ultra-secret backdoor sales methods for online courses. For some reason, they’re always an afterthought. I don’t know why. I’ve made a ton of money from these and it’s cost me $0.
If you don’t already have connections in the industry, then reach out to every blog you can find. They’re always hungry for new content with a unique angle.
Pitch them on a valuable guest post. It could top 3 gardening tips for seniors, 10 hacks for learning the guitar, or how to make $50,000+ from online course sales. It’s up to you.
You’d be surprised how many blogs need content.
At the end of the blog, put a link to your course page and explain why you’re an expert in your field. I’ve got more than 10 guest blogs floating around the SEO world and they’re still bringing in random sales years later.
Podcasts
Same as above. Pods always need new guests. I’ve been on a dozen or so SEO pods where I give away a ton of free value.
The cool thing is those pods often get screen recorded and put up on YouTube too, so you get the pod listeners and random YouTube traffic too. In your bio, put a link to your course page with a discount code for listeners of the pod.
EZ.
A Facebook Group
Facebook groups are the internet’s #1 cash cow. They literally print money for you and it costs $0.
Start a group for your niche/industry and give away as much free value as possible. Share helpful posts and create case studies, testimonials, video teardowns, or group events as often as possible. Inside your group, keep a link to your course.
Most people do the value, value, sell method, meaning they give two value posts for every selling post. But this is tacky, in my opinion. Your group should be about value ONLY. A valuable course will sell itself as long as people know their problem.
I would keep sales posts or promos to once a month maximum.
Lifehack: You can search other Facebook groups in your niche and do AMAs or cross-promos. Some will even let you “rent their banner” and advertise your course there. DO IT.
Step 3 – Paid Marketing
Free, organic marketing should be your bread and butter, but if you want to scale to six or seven figures, you’re going to need paid marketing.
Remember what I said before about running ads on a course landing page? Let me show you what that is:

Unless you have an amazing brand or a super cheap course, this is a recipe for disaster. Clicks can get out of control and the average cold user isn’t going to spend $300+ on a course just from an ad and your sales page.
You need to play the long game and set up a basic funnel. For a basic funnel, you’ll need:
- A lead capture: This is a free piece of value like a downloadable worksheet, case study, or webinar. Just get that email address.
- An email welcome sequence: This could be a short series of emails providing key value points. It doesn’t have to be much. 3-5 emails will do.
- An offer: You’ve given enough value to make a fair offer. Offer a discount on your full course or try to sell something else if you’ve got an upsell.
- Put the user into a bucket based on their action: After the welcome sequence, add them to your “purchased” list or to your “didn’t purchase” list. Those who purchased should be nurtured and offered higher-value products down the line. Those who didn’t need more value. Hold their attention until events like Black Friday or Cyber Monday and hit them with a massive discount. Send them as many happy testimonials and successful case studies as possible to show them what they’re missing.
Conclusion – Isn’t Creating Online Courses Fun?
Don’t listen to all the bulls*** out there about online course creation.
Creating a successful online course is HARD. And that’s a good thing.
There’s no such thing as “5 easy steps” or “Create an online course on ANY TOPIC in a week” or “How to find your topic in 1 day.”
If you want to make six or seven figures from an online course, you’d better be an expert.
Your course topic needs to be in demand. Your course curriculum needs to be all value and no fluff. Your learning journey needs to be smooth.
If you want to charge hundreds of dollars for a course and make thousands off coaching packages and upsells, you need to create an online course that kicks ass—not some BS that you whip up in “3 easy steps over the weekend!!! OMGGG!”
Once you have your topic, this is what you need:
- Get a lapel mic and Camtasia
- Outline your course in 3 layers: big picture, middle picture, and small picture
- Create branded slides in Google Docs
- Record and edit your course inside Camtasia
- Choose a platform for online courses like Kartra, Kajabi, or Thinkific
- Release your course to a small group of testers for feedback
- Edit the S*** out of your course based on feedback and convince some of the testers to be affiliates
- Set up your own website and page for your course within your platform
- Create a basic funnel with upsells
- Market the hell out of it with all of my free marketing channel ideas and paid ads for a funnel
If you want to create online courses that actually sell, get ready to bust your ass. It’s hard, but when you’re done, you’ll have a money-making machine that earns you hundreds or even thousands of dollars while you sleep.
Online course creation is the ultimate level-up for freelancers, entrepreneurs, or even just general hobbyists. Once you know how to create an online course the right way, there’s nothing stopping you from making six or seven figures completely passively.
Are you ready to work for it? You’d better be.
Cohort-Based Courses F.A.Q.
Q: How can I create an online course for free
A: You can create an online course for free by using a free online school like Thinkific, but I don’t recommend it. Online course creation is about providing valuable course content on your course topic. If you are an expert and want to be a course creator, then you should pay for your platform.
Q: How do you design an online course?
A: You design an online course by creating a detailed course outline and then creating course content using slides and video software. Course creation involves dividing your course topic up into modules and then breaking those modules into smaller sections and videos until you’ve covered everything in your course topic. Step 1 to being a course creator is outlining your topic before using online course marketplaces to sell your videos.
Q: What software do I use to create an online course?
A: I recommend Camtasia as the software to use for creating your online course. Camtasia is affordable, simple, and designed specifically for course creation. Every course creator I know uses Camtasia.
Q: How do you create content for an online course?
A: You create content for an online course by using slides and videos. Once you outline your content, make slides step by step. Then, record your screen while talking about your topic. Being an online course creator isn’t easy. There are a few ways to create content, but most creators just screen record.
Q: Do I need a course landing page?
A: Yes, you need a course landing page with all the details about your course to capture user emails for email marketing down the line. You should also explain your technical skills and why you’re an expert AND provide a good course description with a tangible learning outcome. If you want to create a successful course and make money with online learning, you absolutely need a page like this. Your course idea is worthless without it.